Related Content items provide additional details on a given policy and support its proper application. They can either be a document (a file) or a link to a specific internet page.
1. Open the WHO eManual and sign in.
2. Select
Related Content >
Upload Related file from the Settings menu options.
3. Using the Browse option, navigate to the file you want to add to the Related Content library, select it and click
Open.
Do not change the information displayed in the
Destination Folder field.
4. If applicable, add comments in the Version Comments field.
5. Click
OK.
A new screen opens, where you can enter further information regarding the file and select where the file should be added to the Related Content box.
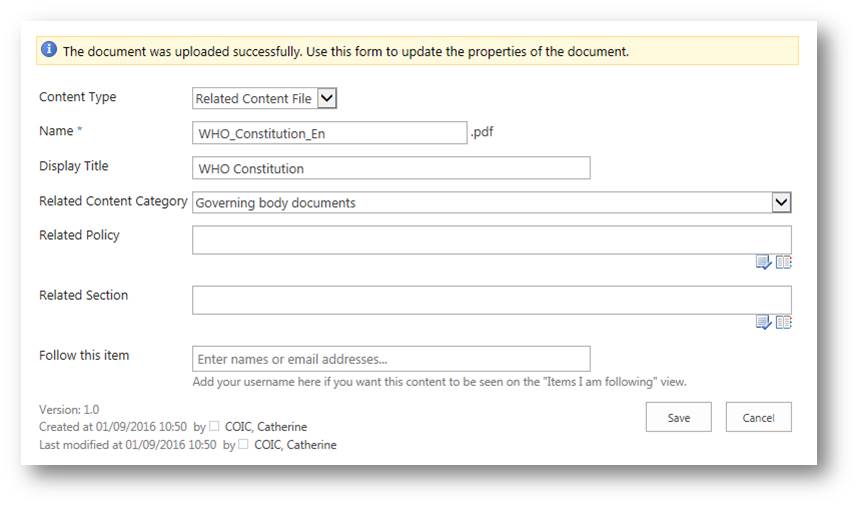
Note: Do not change the information displayed in the
Content Type and
Name fields.
6. Complete the
Display Title field – this information is used to populate the Related Content box on section and policy pages.
7. From the
Related Content Category drop-down list, select the category corresponding to the file – this information is used to sort the files and links in the Related Content box.
8. In the
Related Policy and
Related Section fields, click the
Browse icon to select the policy pages and sections to which the new file is added.
9. Copy the title of the policy page or the section in the search field and click on the Magnifier icon.
10. From the list now displayed, select the relevant policy page or section and click
Add.
11. To add the file to more than one policy page or section, repeat steps 9 and 10.
12. Once all the policy pages or sections have been added, click
OK.
The new file is now added to the Related Content box on the relevant pages.
13. Type your user account into the
Follow this item field – the new item is now added to the
Items I am following list accessible at the top of the Related Content library.
14. Click
Save.
The new file is added to the Related Content library.
1. Open the WHO eManual and sign in.
2. Select
Related Content >
Add Related link from the Settings menu options.
3. In the
Document Name field, type a title for the website.
4. In the
Document URL field, paste the URL of the specific page to which you want to link.
5. Click
OK.
A new screen opens, where you can enter further information regarding the link and select where the link should be added to the Related Content box.
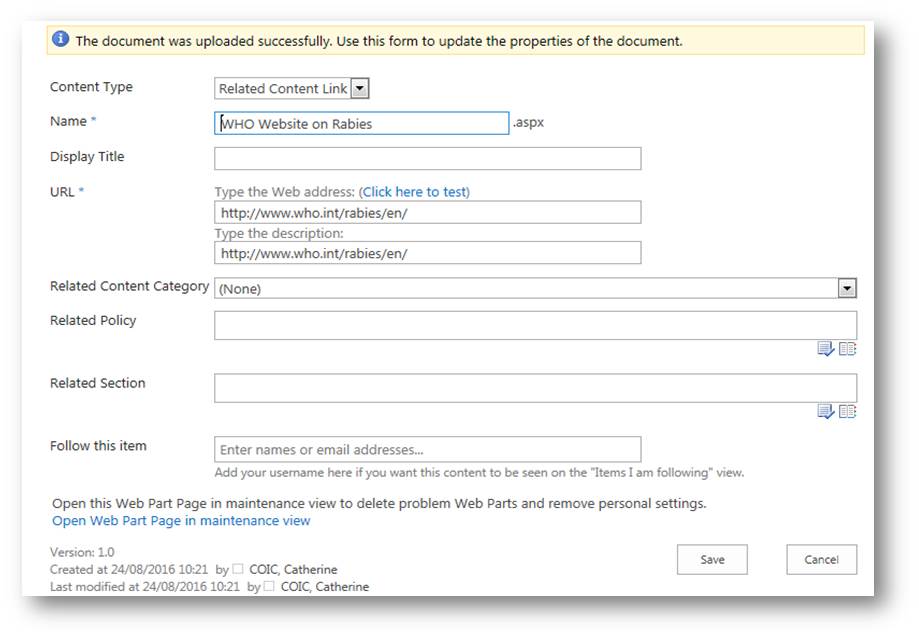
Note: Do not change the information displayed in the
Content Type and
Name fields.
6. Complete the
Display Title field – this information is used to populate the Related Content box on Section and Policy pages.
7. Do not change the information in the
URL field.
8. In the
Related Policy and
Related Section fields, click the
Browse icon to select the policy pages and sections to which the new link is added.
9. Copy the title of the policy page or the section in the search field and click on the Magnifier icon.
10. From the list now displayed, select the relevant policy page or section and click
Add.
11. To add the link to more than one policy page or section, repeat steps 9 and 10.
12. Once all the policy pages or sections have been added, click
OK.
The new link is now added to the Related Content box on the relevant pages.
13. Type your user account into the
Follow this item field – the new item is now added to the
Items I am following list accessible at the top of the Related Content library.
14. Click
Save.
The new link is added to the Related Content library.
It is possible to add a Related Content item to a policy page or a section after the item has already been added to the Related Content library.
1. After having
Sign In to the WHO eManual, select
Related Content >
Manage Related Content from the
Settings menu options.
2. Search for the item you want to add to your policy page or section using the Related Content library search box.
3. Once the item you are looking for is shown on the screen, scroll to the right side of the page until you can see the Edit icon.
4. Click the Edit icon.
A new screen opens
5. In the
Related Policy and
Related Section fields, click the
Browse icon to select the policy pages and sections to which the item is added.
6. Copy the title of the policy page or the section in the search field and click on the Magnifier icon.
7. From the list now displayed, select the relevant policy page or section and click
Add.
8. To add the item to more than one policy page or section, repeat steps 6 and 7.
9. Once all the policy pages or sections have been added, click OK.
The item is now added to the Related Content box on the relevant pages.
10. Type your user account into the
Follow this item field – the new item is now added to the
Items I am following list accessible at the top of the Related Content library.
11. Click
Save.
To learn how to add a policy page, go to the section:
Adding a policy page
To learn how to import and format the text of the policy, go to the section:
Modifying a policy page
- Before adding a new Related Content item, make sure it is not already available in the Related Content library by performing a search at the Related Content Library level.
- After adding a link to the Related Content library, click on it to test it and make sure it opens correctly.
- To easily manage the items you add to the Related Content library, add your email address to the
Follow this item field when uploading a file or adding a link.
Landing page | Destination page of a link. |
Link | Can either be internal – pointing to a destination within the WHO eManual – or external – pointing to a destination outside of the WHO eManual. |
Related Content | Supporting documents to a specific policy. Includes, for example, Information Notes and Standard Operating Procedures. |
Ribbon | A list of menu options that are accessible to users. The content of the ribbon is contextual and changes depending on what actions are being performed or the user's role. |
Settings | A drop-down menu that can be access by clicking the "wheel" icon on the Ribbon. Among other options, allow a contributor to open a policy page in the Edit Mode. on the Ribbon. Among other options, allow a contributor to open a policy page in the Edit Mode. |
URL | Represents the unique address of a specific page on the internet. The URL is used to create a link. |